
How to Deadlift — Guide ON Form and Technique
Let's talk about deadlifting. Today I want to cover technique specifically. Getting the technique right is going to keep you safe and it is also going to make you stronger in the lift.
The deadlift is my favorite exercise to teach for the hinge movement pattern. It is also the lift that transfers best to functional everyday life. Think about every time you pick something up off the ground. Your groceries, a kid, a box. That is a hinge. That is a deadlift.
Deadlifts are not going to hurt you. Doing deadlifts wrong will hurt you. The same is true for every lift. But the deadlift can be loaded more than almost any other movement and we typically train it much closer to our max strength. That makes it even more important to build good habits from the start and do them properly.
The Setup
Let's first get into how to line up with the bar and your stance. The first thing we want to understand is during the entire lift you want the bar to track with your center of gravity. The more we can keep the bar on a straight vertical path the easier the lift becomes.
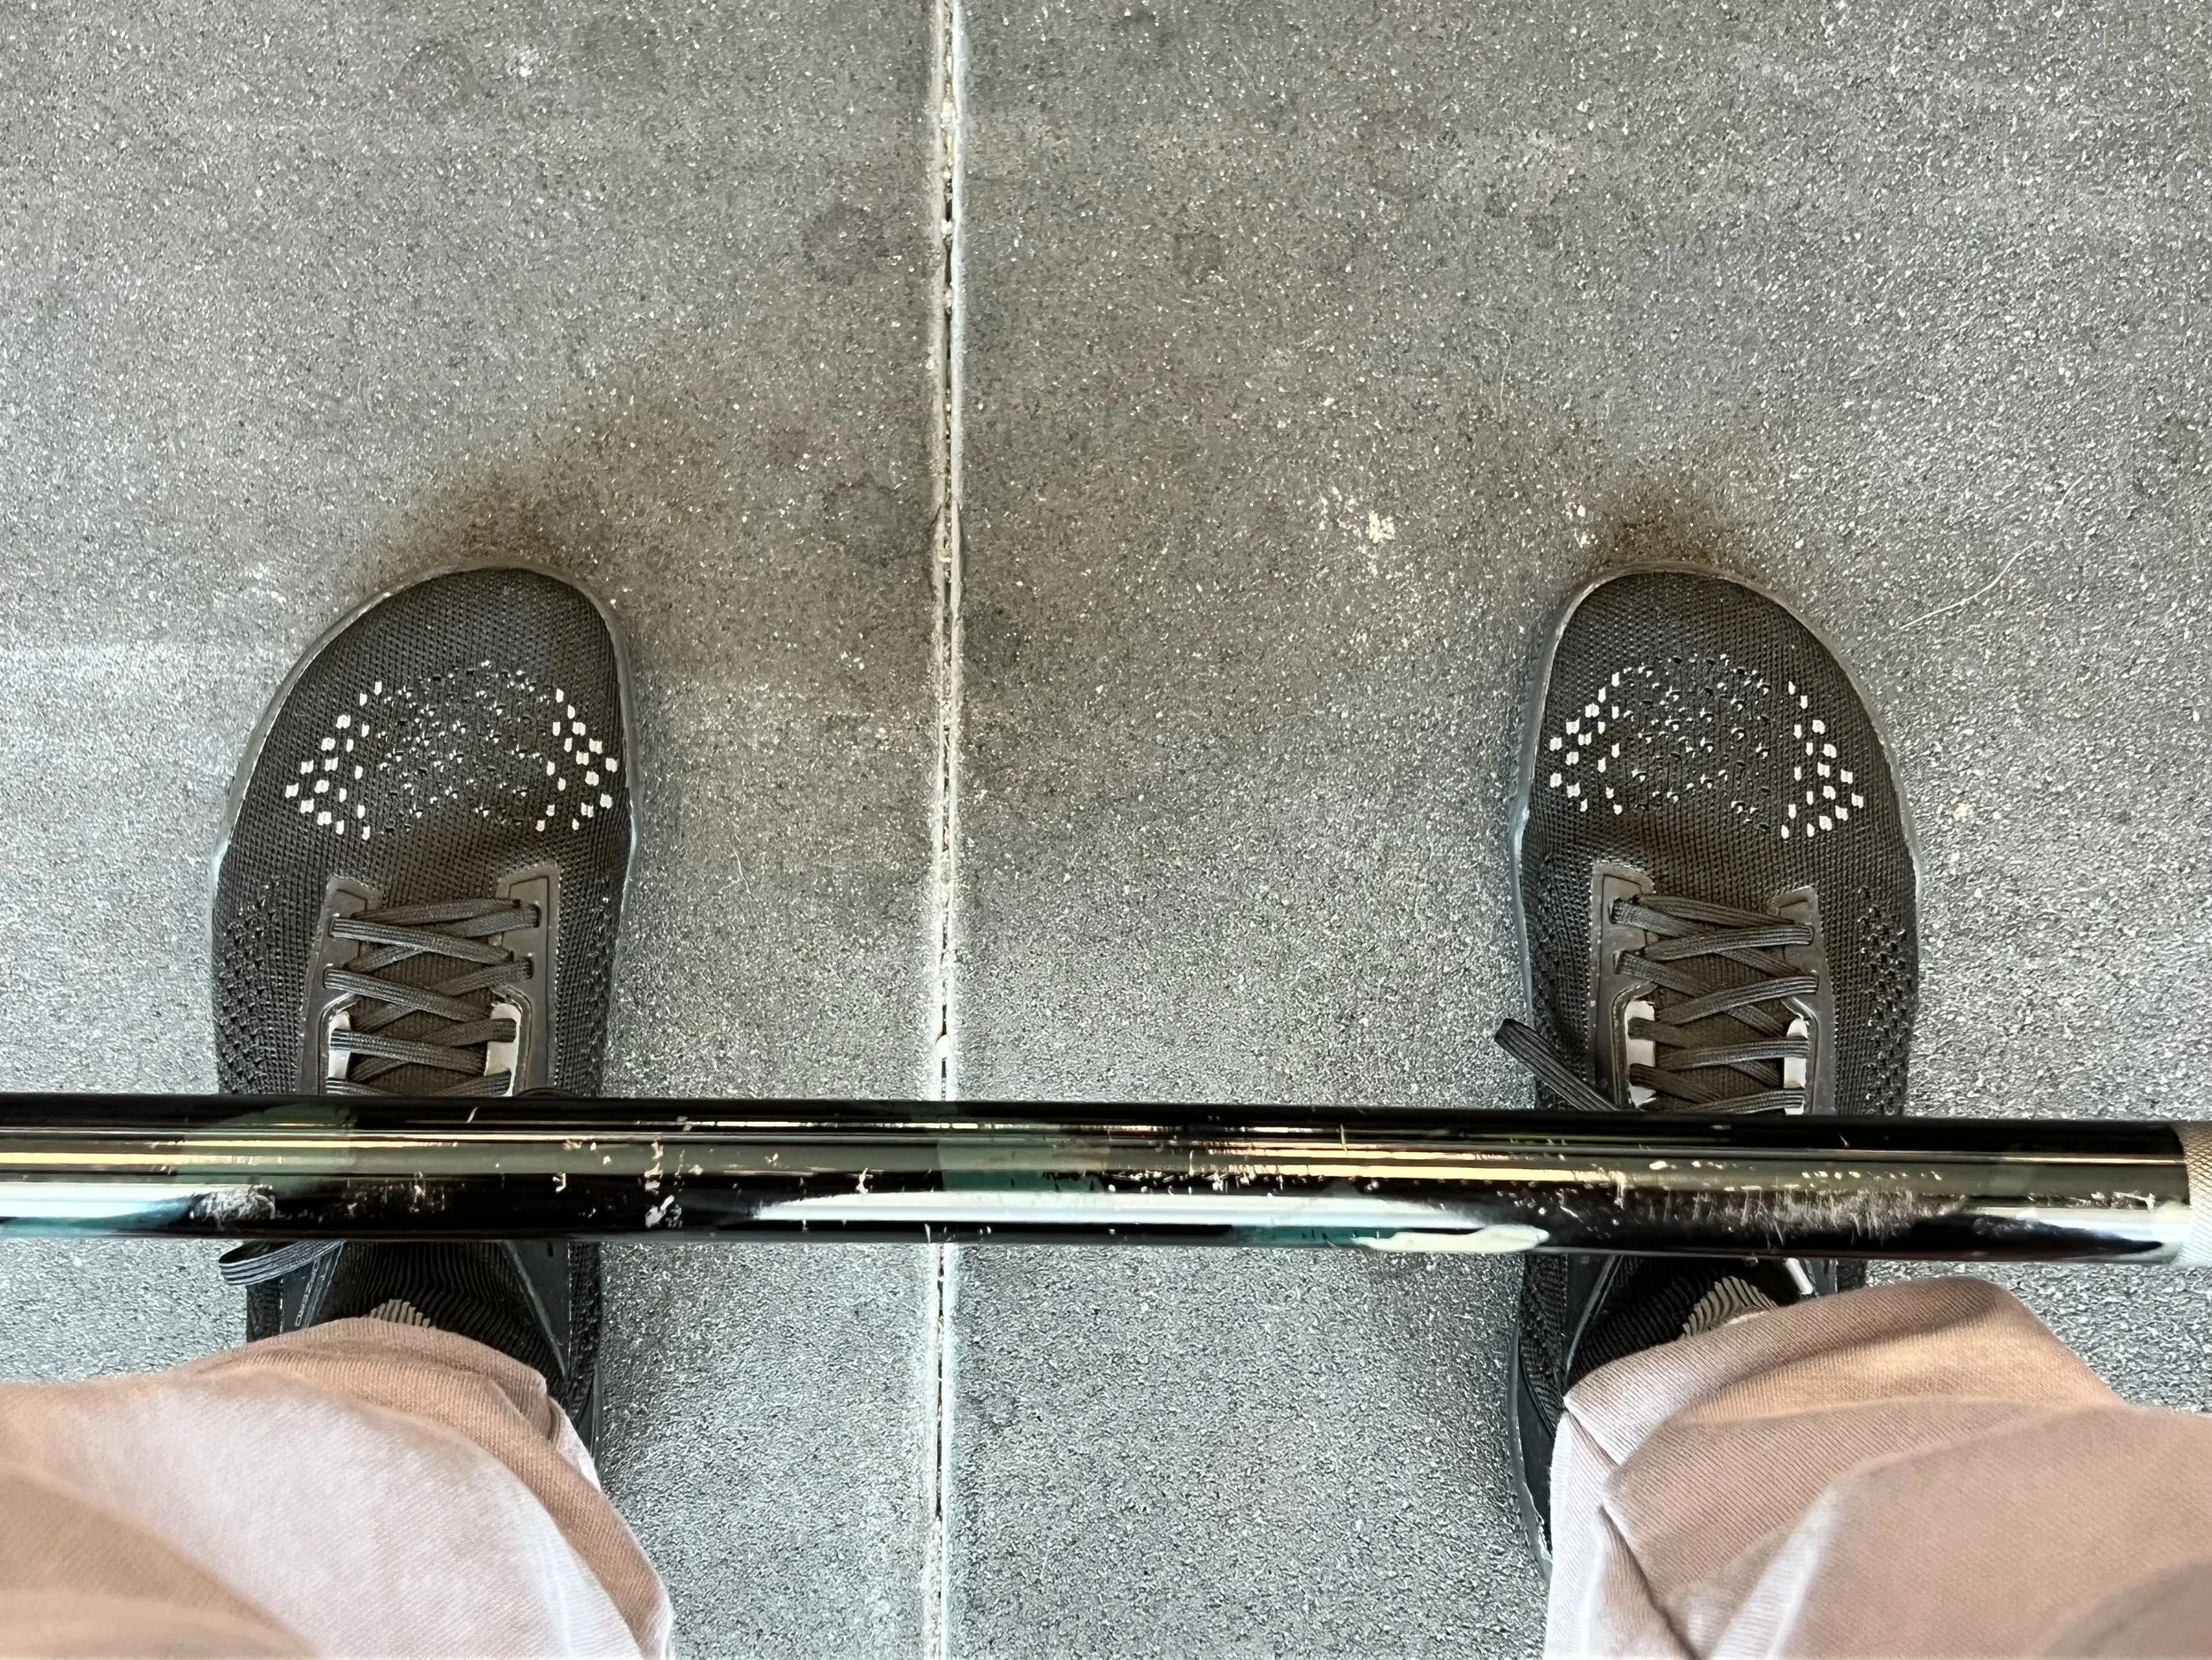
When you line up with the bar you want to make sure the bar is directly over your mid foot. I like to use the part of my shoelaces where you tie the knot as a reference for where the mid foot is. The bar should be covering this. Once in this position the bar should be 1 to 2 inches away from your shins.
Next is your stance. Feet hip width apart. This stance allows us to maximize power transfer from the legs. This also allows your arms to hang as close to your body as possible. The closer your arms are to your body the less unnecessary range of motion you create and the better position you are in to activate your lats during the movement.
Getting Into Position
Now that we are lined up let's get into position for the lift. We want all of these steps to become muscle memory. Take your time between each rep and make sure to check these off as you are learning to get this right.
Grip
There are two grip types I recommend — hook grip and reverse grip. The one I recommend for most people and the one I use myself is reverse grip. I never recommend double overhand unless you are using straps, in which case just go double overhand.
The reason I do not recommend double overhand is because as the weight gets heavier grip is going to start becoming a limiting factor. The bar spins, so with a double overhand grip the bar is going to want to spin right out of your hands. A reverse grip eliminates that problem.
Now the top level powerlifters and Olympic weightlifters use a hook grip. Hook grip is where you wrap your thumb around the bar and grab your thumb with your index and middle fingers. If you can tolerate the discomfort that comes with it then by all means use hook grip — it is the strongest way to grip the bar without straps. But for most people reverse grip is the way to go.
Stacking the Spine
This is one of the most important parts of the technique. Getting this right is what keeps your spine safe and is also a big part of making your lift stronger.
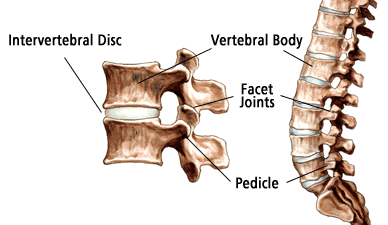
When most people hear straighten your back they pull their shoulders back and down and end up rounding their spine inward. This places more stress on the weaker parts of the spine. We want the tension to fall on the vertebral discs not on the facet joints.
So how do we accomplish that? When you are in your stance the cue I like to use is to think about doing a crunch. When you crunch forward you stack your spine the way we want it. Now I know if you were to look at someone like this it looks like their back is rounded. We are not done here. Once in that position reach your arms straight down and grab the bar, then lift your head to the ceiling. Elongate your spine by thinking about the crown of your head reaching toward the ceiling. This is not about looking up. It is about lengthening the spine from the top. Now from this position our back is nice and straight and our spine is in a safe and powerful position.
Engaging the Lats
With your head to the ceiling the next thing you want to do is pull the front of your shoulders toward your butt. This engages your lats and keeps the bar tight to your body throughout the movement. If the bar is drifting away from your body during the lift your lats are not engaged.
Shins and the Bar
Now when we reach down and grab the bar if our shins are pushing the bar away from us then we are dropping our hips too low. This is one of the most common mistakes beginners make and it usually comes from trying to turn the deadlift into a squat.
The deadlift is not a squat. You are hinging at the hip not sitting down into the movement. When the hips drop too low the shins push the bar forward and now the bar is no longer traveling in that straight vertical path we talked about.
Think about sitting back slightly rather than sitting down. Your hips should be high enough that your shins stay vertical or very close to it. There can be a small amount of forward shin angle but the moment your shins are driving the bar away from your body you have gone too far. Pull the hips up, reset, and find that position where the bar sits directly over the mid foot with your shins just barely touching it.
THe Pull
Now that we are lined up and in position it is time to pick the weight up.
The first thing I want you to think about before you pull is performing the Valsalva maneuver. Right before we pull the slack out of the bar take a deep breath and hold that pressure into your core. Think about pulling your abs in but also pushing them down. The Valsalva maneuver creates intra-abdominal pressure to stabilize the spine and improve power.
Now let's pull the slack out of the bar. When the bar is sitting on the ground there is a small amount of give in the plates and the bar itself. If you grip and rip without taking the slack out first you are essentially yanking the bar off the ground which jolts your entire system and pulls you out of position before the weight even moves. Taking the slack out means creating tension through the bar before it leaves the ground. When you raise the crown of your head to the ceiling and pull your shoulders toward your butt you should naturally pull the slack out already. You will hear a small click when the slack comes out. From that point everything is loaded and ready to move together as one unit.
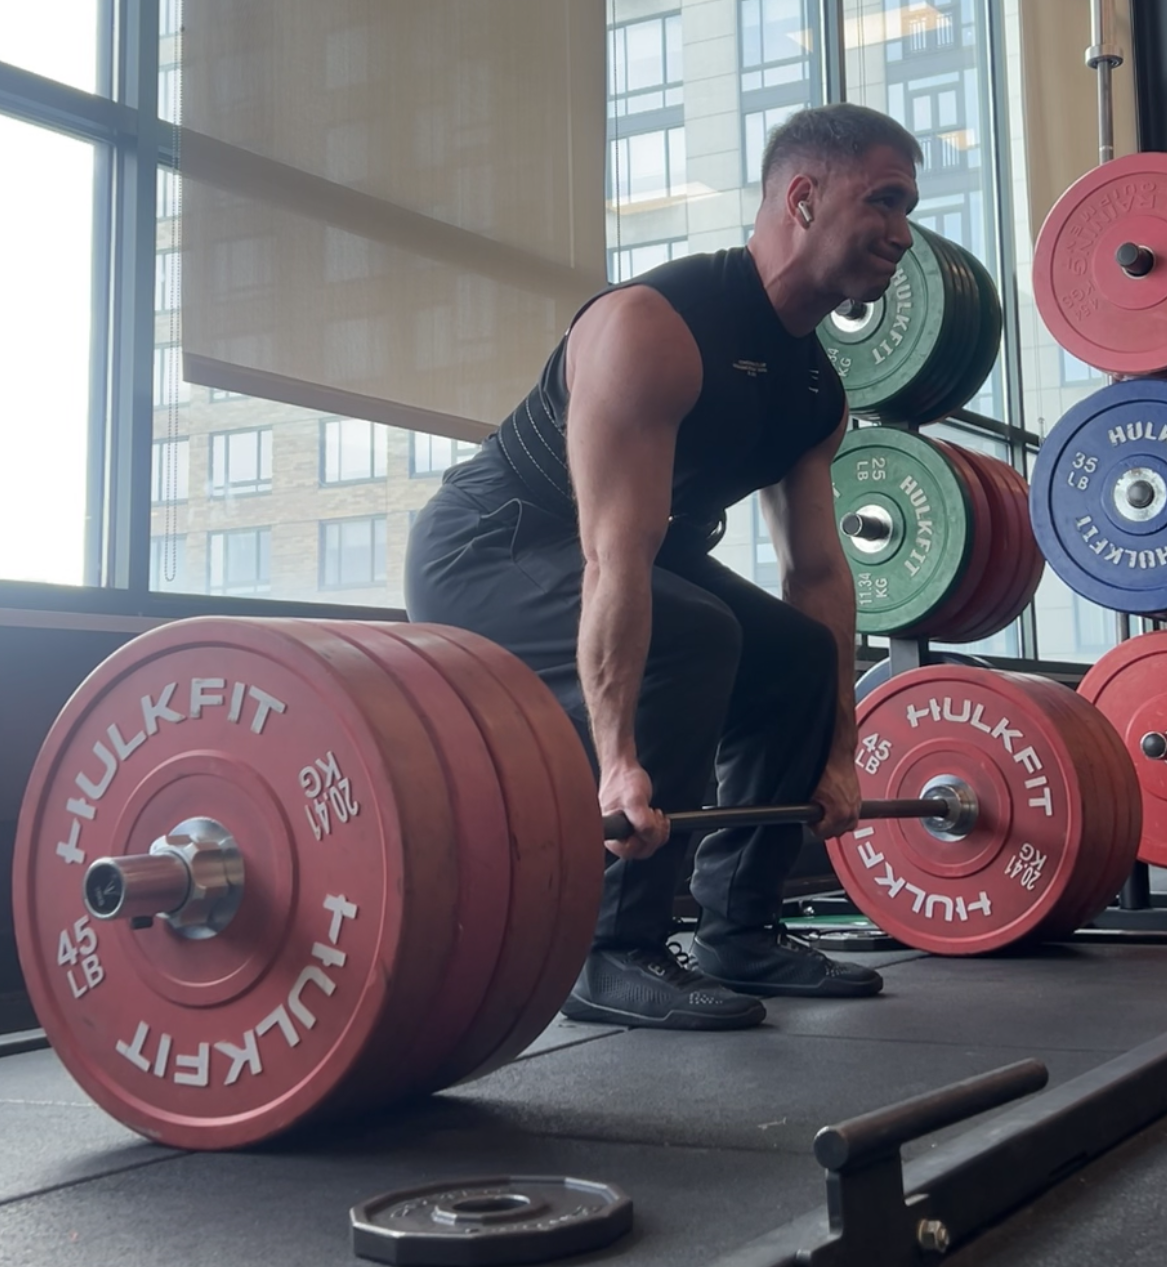
Now I am going to contradict something I said earlier, pick the weight up. I do not typically like to use that terminology because when people think about picking the weight off the ground they pull too much with their back. I want you to think of this lift more like a leg press machine. We are trying to push the ground away from us. The common cue people use is PUSH THE WORLD AWAY. Drive your feet into the ground like you are trying to push the floor down. Your legs initiate the movement. As the bar passes your knees drive your hips through and finish the lift standing tall with your knees locked out and hips fully extended. Think about squeezing your glutes at the top. Your back should be in the same fixed position it started in — do not try to extend the back as you get to the top. The bar should stay in contact with your body the entire way up.
The Descent
Do not just drop the bar or let it crash down. Control the descent. The same muscles that worked to bring the bar up are working to bring it back down.
To lower the bar push your hips back first. If the bar is hitting the top of your knees then you are not hinging your hips enough before lowering. As the bar passes your knees allow them to bend and guide the bar back to the floor. Keep the bar close to your body on the way down the same way you kept it close on the way up. Your lats stay engaged. Your spine stays stacked.
Once the bar is back on the floor take a breath, reset your position, and go again. Do not rush into the next rep. Every rep starts from a dead stop which is where the lift gets its name. Take the time to rebuild your position before you pull again.